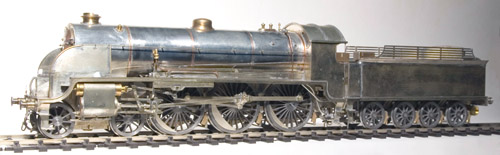
The Prototype
The King Arthur class has a complicated history that not all of the standard texts get right. The best reference is, as usual, D L Bradley (Locomotives of the LSWR: The Urie Classes, Wild Swan), which, despite the title, also deals with Maunsells SR designs that were developments of Urie LSWR locos.
My model represents the first King Arthur series, built soon after grouping. For bookkeeping rather than engineering reasons, these were classed as rebuilds of the Drummond 4-6-0s, but in reality little more than the tenders survived of those disasters-on-wheels.
These engines spent their time, until well into BR days, in front of large, 4500 gallon capacity watercart tenders. The cabs and smokebox doors were pure Urie. Smoke deflectors were added to the class in about 1930, and the snifting valves on the smokebox were removed at some time in the 1930s.
My model thus represents the class in the early 1930s.
The Model
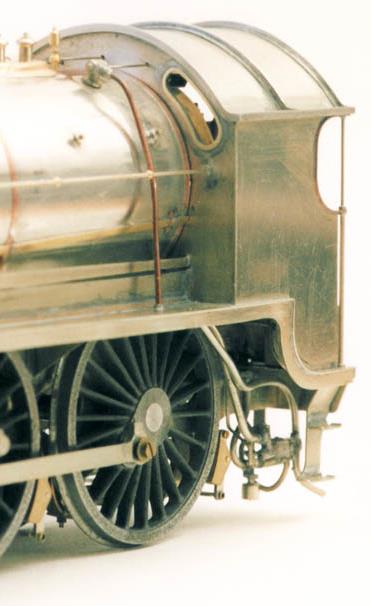
Most of the platework was done in nickel silver. The frames are 0.7 mm thick, which is near enough scale thickness. Most of the other parts of the chassis were done in the same material. Machining readily gives the sharp edges and square corners, which are more difficult (but not impossible) to achieve with etching. The motion brackets and cylinders are bolted to the frame, so that the complete motion can be disassembled for painting or maintenance.
The driving wheels are neither sprung nor compensated, but are simply allowed to drop slightly below the datum (but not to rise above it). In a 4-6-0, and similar large locos, it is easy to get most of the weight on the driving wheels, and that is enough for good traction and roadholding.
The King Arthur class has a complicated history that not all of the standard texts get right. The best reference is, as usual, D L Bradley (Locomotives of the LSWR: The Urie Classes, Wild Swan), which, despite the title, also deals with Maunsells SR designs that were developments of Urie LSWR locos.
My model represents the first King Arthur series, built soon after grouping. For bookkeeping rather than engineering reasons, these were classed as rebuilds of the Drummond 4-6-0s, but in reality little more than the tenders survived of those disasters-on-wheels.
These engines spent their time, until well into BR days, in front of large, 4500 gallon capacity watercart tenders. The cabs and smokebox doors were pure Urie. Smoke deflectors were added to the class in about 1930, and the snifting valves on the smokebox were removed at some time in the 1930s.
My model thus represents the class in the early 1930s.
The Model
Most of the platework was done in nickel silver. The frames are 0.7 mm thick, which is near enough scale thickness. Most of the other parts of the chassis were done in the same material. Machining readily gives the sharp edges and square corners, which are more difficult (but not impossible) to achieve with etching. The motion brackets and cylinders are bolted to the frame, so that the complete motion can be disassembled for painting or maintenance.
The driving wheels are neither sprung nor compensated, but are simply allowed to drop slightly below the datum (but not to rise above it). In a 4-6-0, and similar large locos, it is easy to get most of the weight on the driving wheels, and that is enough for good traction and roadholding.
Lady of the Lake (Ramsbottom version)
King Arthur
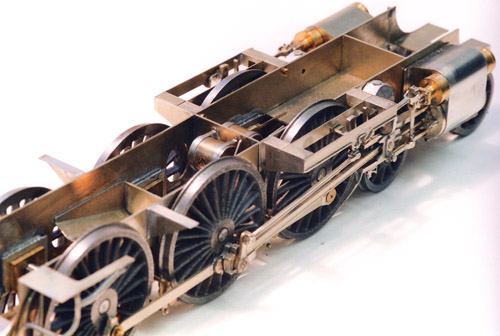
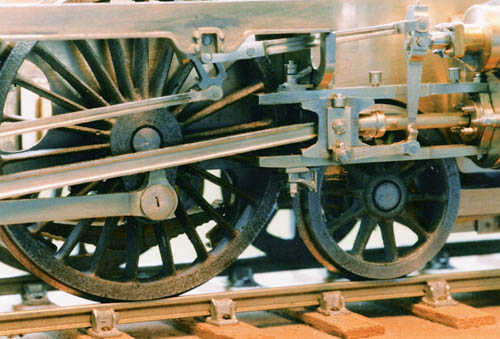
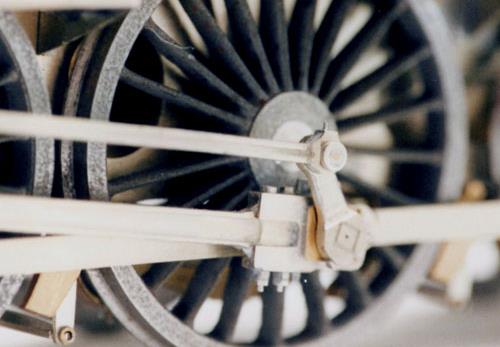
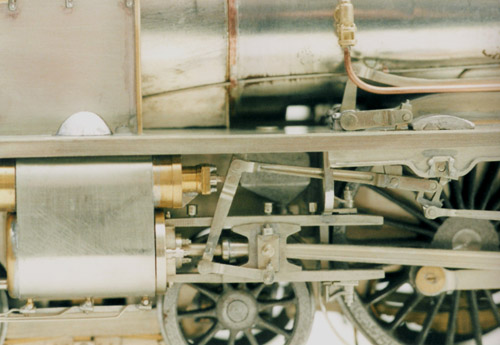
The rods and valve gear were also machined from nickel silver. By machining, one can produce a three-dimensional solidity in these components that gives a sense that they really can transmit the forces involved in starting a heavy train. The kit method of soldering up layers of etches does not provide quite the same effect. I think that for me this was actually the most satisfying part of the project. In the photos, the crankpin on the front wheel was a temporary one used during construction, that could be easily removed with a screwdriver. The finished crankpin has to be gripped in a pin chuck to unscrew it.
I dont really have any problems with clearances for outside valve gear. The narrower than scale gauge of O fine scale means that, even though the wheel tyre is thicker than scale, the distance across the fronts of the wheels is no greater than the prototype. Thus, if the cylinder centres are set at the correct spacing and the rods are all made to scale thickness, everything fits and works.
The return crank and marine-style big end were important features that had to be right. The crankpin bearing is brass because that of the prototype was also. I dont like painted motion parts. Alan Brackenbrough considers nickel silver looks enough like oiled steel to pass, and I have not his colour sense so I wont argue with that, but prototype brass has to be brass on the model.
The wheels are Alan Harris castings. I was disappointed with the finish of the tyres that I achieved, in spite of trying everything. At the time I had only the small Sherline lathe and it proved to be insufficiently rigid for the purpose. It was only just big enough, too. When turning there was only about 0.2 mm clearance between the flange and the topslide! That was one important reason for acquiring the Myford lathe, which does a better job.
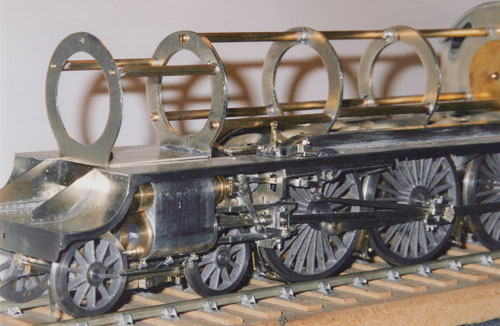
Here is one last shot of the motion before moving on. In this photo the boiler is in place, and you can see how the lagging on the prototype was cut away underneath to allow space for the reversing shaft - not a very elegant design feature, but I suppose the desire was to fit a large-diameter boiler within the Southerns rather restricted loading gauge.
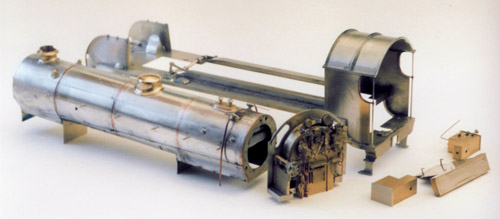
This is the skeleton of the boiler. In case you are wondering why I did not just roll the boiler, it is because it is not circular! The front ring of the boiler is tapered, but for modelling purposes, it is the outside shape of the lagging rather than the boiler that is important. The smokebox is the same diameter as the outside of the lagging, but its centre is lower than that of the rear part of the boiler and the firebox by a scale 1 mm, which is not a lot, but it shows. The reason was most likely the restricted loading gauge. The front ring of the boiler thus appears as a complex sheared cylinder. The skeleton was made in three parts: the smokebox, the front ring, and the rest of the boiler and firebox.
The profile shapes were cut and joined with spacer rods turned to the exact length, initially screwed then soldered in place, with the appropriate drop in the front ring. Each part was then covered with a skin, pre-rolled to fit, and soldered in place. That of the first ring was made slightly over length, juggled about to fit the profiles at each end, soldered up, and then the excess was trimmed off so that it mated properly with the other two components. The three components were screwed together, and I can just about get at the screws with a screwdriver poked in here and there, but once assembled, why would I want to?
The profile shapes were cut and joined with spacer rods turned to the exact length, initially screwed then soldered in place, with the appropriate drop in the front ring. Each part was then covered with a skin, pre-rolled to fit, and soldered in place. That of the first ring was made slightly over length, juggled about to fit the profiles at each end, soldered up, and then the excess was trimmed off so that it mated properly with the other two components. The three components were screwed together, and I can just about get at the screws with a screwdriver poked in here and there, but once assembled, why would I want to?
The principal body components are shown here. Everything screws together and comes apart for painting. It also makes the construction much easier, for example, I did not have to fiddle about inside the cab to complete all the backplate fittings. Most body parts were made from 0.3 mm or 0.4 mm thick nickel silver. Edges that show, like the footplate, are bevelled underneath with a file before assembly so that they present something like scale thickness. Big solid parts like the toolboxes in the cab are machined from solid, which I find easier than building up.
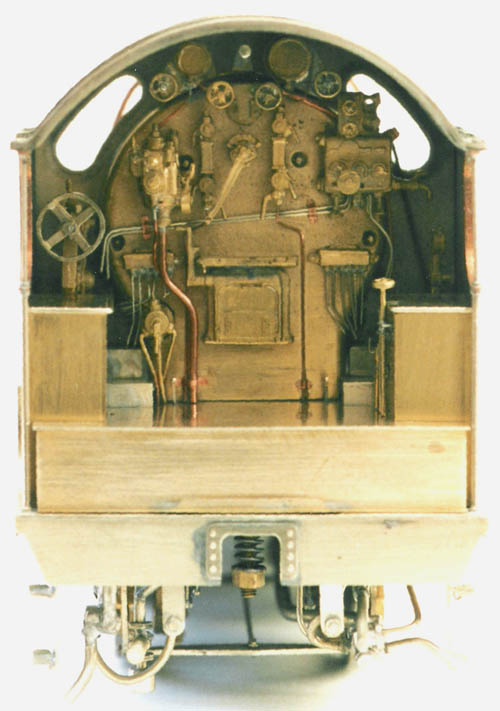
The cab fittings are mostly Shedmaster (now Laurie Griffin). Im certainly not adverse to using commercial components when they are available and of a quality that matches my purpose. Copper wire of various thicknesses is used for the steam pipes. The injectors were my first attempt at casting in whitemetal. To begin with, I built them up from various turned and machined parts (about twenty for each), but it took such a long time that I decided on the spot to use the prototypes I had just made as casting masters, so that I would be spared the task if I ever made another Urie or Maunsell 4-6-0.

Nick Baines • Model Engineering