Most of my soldering is done using a temperature controlled iron rated at 80W. It has interchangeable bits but I only ever use two. Both as the usual "screwdriver" shape, one is about 3mm wide for the big stuff including frames and spacers, and one is about 1.5mm wide for fine stuff. Just occasionally I use a gas torch when some serious heating is required, or when access with the soldering iron is difficult. I have never used a resistance soldering unit (RSU) so I cannot say anything about them.
I've never used lots of soIders of different melting temperatures, and I don't think it's necessary. The keys are to plan the order of assembly, make parts fit well together so that they are less likely to fall apart, and use nickel silver rather than brass because it conducts heat much less well. I use resin-cored solder which is no longer available because of the lead content because I bought a large reel of it years ago and it will probably see me out. I use Carr's liquid fluxes (in addition to the flux in the solder). It doesn't matter a whole lot which flux you use as long as you avoid the obviously specialist ones like the one for white metal or stainless steel.
There is not a great deal of advice I can pass on about soldering, because it really is just a matter of practice. The two essentials are cleanliness and heat. Using a liquid flux does mean that the surfaces do not have to be quite as clean as they otherwise should be, because its main purpose is to render the surfaces chemically clean so that the solder bonds firmly, but I do try to give them a good polish with wet-and-dry paper or a glass fibre brush and then to avoid handling them before soldering. Flux is applied with a small paintbrush. The aim should be to use just enough flux, which means there should be a small liquid meniscus just visible where the join is to be made but no more than that. A big puddle of flux does not make soldering easier or better, and runs the risk of spreading fumes or droplets of flux about the work area. Excess flux can be removed before soldering by first wiping the brush on a rag to remove any flux, and applying it dry to the work.
It is then a matter of applying sufficient heat to ensure that the solder melts and flows right through the join. It is hot enough when the solder is mobile and has a silvery surface. Capiliary action draws the molten solder between the surfaces to be joined. It is the solder in the joint itself, not the fillets of solder on the outside surfaces, that give the joint its strength. The aim should be to use enough solder to fill the join, and that will be sufficient.
Melting some solder on the bit before bringing it to the work is important, because that makes for a better contact between the bit and the work, and enables the work to heat up more quickly. For small parts, the molten solder on the bit can then be allowed to flow into the join, and that should be enough solder to make the join. For larger parts, it is necessary to add solder to the work while it is hot enough to melt the solder. That, of course, means you need two hands, one to hold the iron and one to hold the solder, so there is not a hand free to hold the work. In such circumstances, some form of clamping is essential.
The clamping plate
This has proved to be an invaluable tool for holding parts together for soldering, and occasionally for other assembly purposes. It is made from an off-cut of hardwood, planed and sanded to a smooth and level surface. Wood is a good thermal insulator, which means less heat is required to solder the join, and the plate never gets too hot to handle. Into this plate are set a number of bushes of brass or aluminium, which are drilled and tapped for set screws. The clamps themselves are located where they are required on the plate, and held in place by the set screws. The clamps have balancing screws with large, flat heads, so as to be able to clamp materials of different thicknesses. The clamps are made from stainless steel, which is ideal for the job because it does not rust even when exposed to flux, and does not conduct heat very well. I wish I could say that I thought about that in advance, but in reality I happened to have some strips of stainless steel of just the right size in my scrap box. I also have a couple of additional strips of hardwood, planed flat and square, that can be used to hold parts at right angles to each other for soldering. Where necessary, I can also use small toolmakers clamps for additional holding.


Cleaning up
The best way to clean up after soldering is to avoid having to do it. Donít use more solder than is necessary to make the join. Most of the strength comes from the solder that is between the two parts being soldered. Leaving large fillets of solder outside the join does not add a great deal of strength. And of course, wherever possible, solder on the inside or the underside where it wonít be seen.
Even so, there are times when none of these things is completely practical, and it is necessary to clean up the excess solder. I prefer not to use needle files, because the solder clogs them and it is necessary to stop and clean the file frequently, and they do not get into inside corners. Wet and dry paper avoids the clogging problem, but also does not get into inside corners. Both methods mark the underlying material, and the marks then have to be polished out for a really good finish. Fibreglass brushes are great for removing the last traces of solder and providing a very fine finish, but are too slow for removing solder in any quantity.
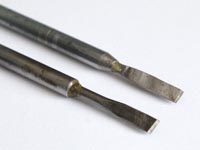
In most cases, the tool that I use is a scraper. These two scrapers were made from worn out needle files. Grip the blade of the file in a vice, leaving the handle and just a short length of blade showing, and tap it with a hammer to break it off. The remaining teeth on all surfaces of the blade must be removed. I find that an oilstone is better for this than a bench grinder. It is slower, but it produces a better finish. The end should also be ground to a chisel shape. Unless the needle file came fitted with a proper handle originally, it will need one, because the effort required to push a scraper is greater than for a file. My handles are simply pieces of tube of the right dimension. The file handle is secured in the tube with epoxy.
Scrapers like this can be made from any shape of file. Flat, triangular and square files are all useful shapes. Being made of hard steel, they cut soft solder very well and rarely need sharpening. Unfortunately, they also mark the underlying brass or nickel silver (both much softer than steel), and it is difficult to avoid unsightly scratch marks that can be hard work to polish out. That is why I came up with the brass scraper.
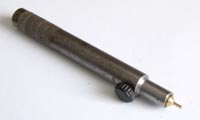
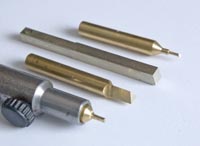
The blade of this tool is simply filed up from a piece of hard brass. It is harder than solder so it still cuts the solder away, but not so hard that it marks the underlying parts. The only real disadvantage is that it requires sharpening more often than a steel scraper, but it only needs a few strokes of a file to restore the edge. This photo shows a small, square scraper which is useful for getting in to tight spaces. In this case, the handle is probably more sophisticated than it needs to be, being turned and drilled at one end for the chisel bit, with a locking screw to hold the bit in place. I have made several bits for different purposes. The triangular one, although it takes a bit more making, has proved to be the most useful general-purpose shape. The round bit was made when I intentionally wanted to leave a uniform fillet of solder in some inside corners. I was building up a component which, on the prototype, was a casting and had fillets rather than sharp corners. Under a coat of paint, the final effect was quite realistic.


Soft soldering

Nick Baines • Model Engineering
The clamping plate in action
Scrapers made from old needle files
A selection of scrapers made from hard brass or nickel silver
A holder for the scrapers